It's up on craftsy. I made it into a downloadable pattern. So go for it. :)

This is just my lil place to show what I'm either working on or have made.
Monday, December 17, 2012
Sunday, December 9, 2012
This is cool!
I found this on you tube and thought this was too good not to share, especially if you have children. This is just a grand find.
Leisure Arts on YouTube has Crochet videos geared toward teaching children how to crochet.
http://www.youtube.com/watch?v=WCmKiqPFAU0&list=PLfQWm8xWTiQK0rcMbcfFbHi5OQn9OE31X
Leisure Arts on YouTube has Crochet videos geared toward teaching children how to crochet.
http://www.youtube.com/watch?v=WCmKiqPFAU0&list=PLfQWm8xWTiQK0rcMbcfFbHi5OQn9OE31X
This is cool!
I found this on you tube and thought this was too good not to share, especially if you have children. This is just a grand find.
Leisure Arts on YouTube has Crochet videos geared toward teaching children how to crochet.
http://www.youtube.com/watch?v=WCmKiqPFAU0&list=PLfQWm8xWTiQK0rcMbcfFbHi5OQn9OE31X
Sunday, December 2, 2012
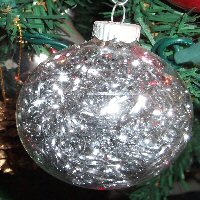
Craft tutorial:old Glass Christmas Ball Ornaments

Tutorial
How to resurrect old Glass Christmas Ball Ornaments
Do you have old ancient glass ball ornaments lying around that have the art wearing off of them. There is a way to resurrect those old ornaments into looking like you just bought them.
All you need is.
GLASS Ornament balls that have the artwork worn off or almost worn off. I am not sure it will work on anything other than the old glass ones.
a container round or square
Dish soap and warm water.
Tree tinsel any color
Band aids (Be careful those edges are sharp. Especially don't handle them to rough or drop them. eek)
First in a large pale or pan fill with warm water and dish soap about half way up.
Immerse the ornaments one at a time rubbing your fingers gently on them to rub off any excess color or decoration. soaking them as well. Until all the color and stuff is off them.
Then once all dried inside and out take any color of tinsel Mine here are all silver.
And I would probably take something rather skinny and not sharp stick poke the tinsel inside the ball carefully. Fill them up to the rim of the ball.
Then place its topper on and voila you have a virtually brand new ornament.
They glisten in the multicolored or white light and are beatiful decoration for any tree, wreath.
Tutorial Glass Ball ornaments filled with tinsel
Do you have old ancient glass ball ornaments lying around that have the art wearing off of them. There is a way to reserrect those old ornaments into looking like you just bought them.
All you need is.
GLASS Ornament balls that have the artwork worn off or almost worn off. I am not sure it will work on anything other than the old glass ones.
a containter round or square
Dishsoap and warm water.
Tree tinsel any color
Band aids (Be care ful those edges are sharp. Especially don't handle them to rough or drop them. eek)
First in a large pale or pan fill with warm water and dish soap about half way up.
Immerse the ornaments one at a time rubbing your fingers gently on them to rub off any excess color or decoration. soaking them as well. Until all the color and stuff is off them.
Then once all dried inside and out take any color of tinsel Mine here are all silver.
And I would probably take something rather skinny and not sharp stick poke the tinsel inside the ball carefully. Fill them up to the rim of the ball.
Then place its topper on and voila you have a virtually brand new ornament.
They glisten in the multicolored or white light and are beatiful decoration for any tree, wreath.
Saturday, December 1, 2012
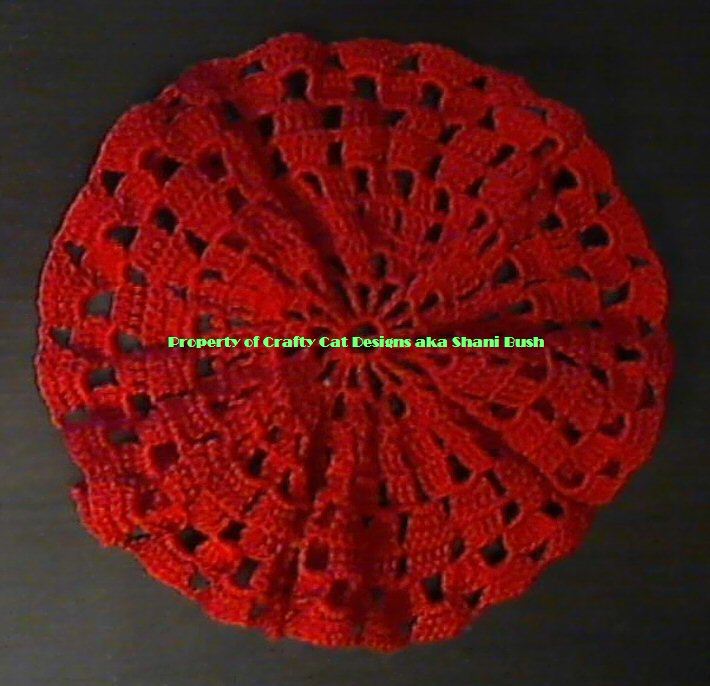
My Lattice n Shells Doily Pattern Is being featured
The doily is being featured on the Online Digital Magazine Inspired Crochet this month.
www.InspiredCrochet.com
My Lattice n Shells Doily Pattern Is being featured
The doily is being featured on the Online Digital Magazine Inspired Crochet this month. Very cool huh!
Wednesday, November 28, 2012
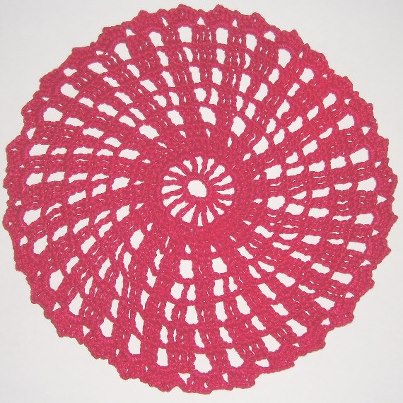
Christmas Lattice and Shells Doily
This is the version on Craftsy and Ravelry
I am placing it here too so that people if they would rather not sign up for craftsy and ravelry they can get it here.
As I maybe listed on All Free Crochet.com
Designed By Shani Bush
AKA Crafty Cat Patterns
©2012 The pattern its self may not be copied and sold as your own. You may share a link to my
patterns. You may do with what you want with the doily that you made, including sell it. You made it after all.
Materials:
Steel size 7 crochet hook
Size 10 Crochet Cotton Thread. (Can be used with yarn as well.)
Stitch Abbreviations:
Ch = Chain
Dc = Double Crochet
Tr = Trebble Crochet
Rnd = Round
SS = Slip Stitch
Sp = Space
*Repeat pattern following (*) as many times as indicated.
Finished Size: Approximately 6 to 6 1/2 inches depending on tightness of stitch.
Ch 8, join with ss to form ring.
Rnd 1. Ch 6, * tr in ring, ch 2; repeat from * 15 times more, join with ss to 4th ch of the beginning ch-6 : 16 ch 2 sps.
Rnd 2. Ss st in first sp, ch 3 (counts as 1st dc), 2 dc in same sp, * 3 dc in next sp; repeat from * around, join with sss to first dc: 48 dcs.
Rnd 3. Ch 3 (counts as 1st dc, throughout), dc in next 2 sts, ch 2, * dc in next 3 sts, ch 2; repeat from * round, join with ss to first dc: 16 3 dc groups, 16 sps.
Rnd 4. Ch 4, 2 tr in next 2 st, ch 2, 1 tr in next ch 3 sp, ch 2 * 3 tr over next 3 tr, ch 2, tr 1 in ch 3 sp, ch 2; repeat from * around, join to first tr: 16 3tr groups, 16 sps.
Rnd 5. Ch 4, 2 tr in next 2 st, ch 2, 1 tr in ch 3 sp, ch 2 * 3 tr over next 3 tr, ch 2, 1 tr in ch 3 sp,
ch 2; repeat from round, join to first tr : 16 3tr groups, 32 sps, 16, 1 tr.
Rnd 6. Ch 4, 2 tr in next 2 st, ch 2, 2 tr in same tr st, ch 2, skip ch 2 sp, * tr in next 3 sts, ch 2 skip ch 2 sp, 2 tr in same tr st, ch 2, skip ch 2 sp; repeat from * around, join with ss to first tr : 16 3tr groups, 16 2 tr groups, 32 sps.
Rnd 7. Ch 4, 2 tr in next 2 sts, ch 2 , 1 tr in ch 2 sp, 2 tr over next 2 tr group, 1 tr in ch 2 sp, 2 tr over next 2 tr group, 1 tr in ch 2 sp ch 2, * 3 tr over 3 tr group, ch 2, 1 tr in ch 2 sp, 2 tr over next 2 tr group , 1 tr in ch 2 sp, ch 2, repeat from * around; join wiht ss to first tr : 16 tr groups, 16 4 tr groups, 32 sps.
Rnd 8. Ch 4, 2 tr in next 2 sts, ch 2 skip sp, 1 tr in each of the next 4 tr, ch 2, skip sp, * tr in each of next 3 tr, ch 2, skip sp, tr in each of next 4 tr, ch 2 skip sp; repeat from * around; join with ss to first tr : 16 3tr groups, 16 4 tr groups, 32 sps.
Rnd 9. Ss in sp, ch 3, 2 dc, ch 2, 3 dc in sp, * 3 dc, ch 2, 3 dc ( shell st is made) in next sp; repeat from * around; join to first ch 3 st and tie off weaving ends in. Iron. 32 Shells.
I am placing it here too so that people if they would rather not sign up for craftsy and ravelry they can get it here.
As I maybe listed on All Free Crochet.com
Christmas Lattice and Shells Doily
Designed By Shani Bush
AKA Crafty Cat Patterns
©2012 The pattern its self may not be copied and sold as your own. You may share a link to my
patterns. You may do with what you want with the doily that you made, including sell it. You made it after all.
Materials:
Steel size 7 crochet hook
Size 10 Crochet Cotton Thread. (Can be used with yarn as well.)
Stitch Abbreviations:
Ch = Chain
Dc = Double Crochet
Tr = Trebble Crochet
Rnd = Round
SS = Slip Stitch
Sp = Space
*Repeat pattern following (*) as many times as indicated.
Finished Size: Approximately 6 to 6 1/2 inches depending on tightness of stitch.
Ch 8, join with ss to form ring.
Rnd 1. Ch 6, * tr in ring, ch 2; repeat from * 15 times more, join with ss to 4th ch of the beginning ch-6 : 16 ch 2 sps.
Rnd 2. Ss st in first sp, ch 3 (counts as 1st dc), 2 dc in same sp, * 3 dc in next sp; repeat from * around, join with sss to first dc: 48 dcs.
Rnd 3. Ch 3 (counts as 1st dc, throughout), dc in next 2 sts, ch 2, * dc in next 3 sts, ch 2; repeat from * round, join with ss to first dc: 16 3 dc groups, 16 sps.
Rnd 4. Ch 4, 2 tr in next 2 st, ch 2, 1 tr in next ch 3 sp, ch 2 * 3 tr over next 3 tr, ch 2, tr 1 in ch 3 sp, ch 2; repeat from * around, join to first tr: 16 3tr groups, 16 sps.
Rnd 5. Ch 4, 2 tr in next 2 st, ch 2, 1 tr in ch 3 sp, ch 2 * 3 tr over next 3 tr, ch 2, 1 tr in ch 3 sp,
ch 2; repeat from round, join to first tr : 16 3tr groups, 32 sps, 16, 1 tr.
Rnd 6. Ch 4, 2 tr in next 2 st, ch 2, 2 tr in same tr st, ch 2, skip ch 2 sp, * tr in next 3 sts, ch 2 skip ch 2 sp, 2 tr in same tr st, ch 2, skip ch 2 sp; repeat from * around, join with ss to first tr : 16 3tr groups, 16 2 tr groups, 32 sps.
Rnd 7. Ch 4, 2 tr in next 2 sts, ch 2 , 1 tr in ch 2 sp, 2 tr over next 2 tr group, 1 tr in ch 2 sp, 2 tr over next 2 tr group, 1 tr in ch 2 sp ch 2, * 3 tr over 3 tr group, ch 2, 1 tr in ch 2 sp, 2 tr over next 2 tr group , 1 tr in ch 2 sp, ch 2, repeat from * around; join wiht ss to first tr : 16 tr groups, 16 4 tr groups, 32 sps.
Rnd 8. Ch 4, 2 tr in next 2 sts, ch 2 skip sp, 1 tr in each of the next 4 tr, ch 2, skip sp, * tr in each of next 3 tr, ch 2, skip sp, tr in each of next 4 tr, ch 2 skip sp; repeat from * around; join with ss to first tr : 16 3tr groups, 16 4 tr groups, 32 sps.
Rnd 9. Ss in sp, ch 3, 2 dc, ch 2, 3 dc in sp, * 3 dc, ch 2, 3 dc ( shell st is made) in next sp; repeat from * around; join to first ch 3 st and tie off weaving ends in. Iron. 32 Shells.
Saturday, November 24, 2012
New and Different Patterns
After having luck finding an online latch hook and cross stitch creator I have made two flower patterns. One being rug hooking and the other being cross stitch. They are up at my craftsy store. Crafty Cat store
New and different patterns
After having luck finding an online latch hook and cross stitch creator I have made two flower patterns. One being rug hooking and the other being cross stitch. They are up at my craftsy store. Crafty Cat store
Tuesday, November 13, 2012
Random question 1
Lets have some fun questions. With Holidays fast approaching my questions are going to be holiday themed. And Random
What is your favorite Food on Thanksgiving?
Random questions 1
Lets have some fun questions. With Holidays fast approaching my questions are going to be holiday themed. And Random........
What is your favorite Food on Thanksgiving?
What is your favorite Food on Thanksgiving?
Saturday, November 10, 2012
Embroidered Quilt top 2
 I just recently completed a square of the other embroidered quilt top last night.
This one is going to definitely take a while to complete totally. LOL But I love how it’s turning out better than I expected. The colors mesh well together don’t you think?
Embroidered Floral Quilt top 2
I just recently completed a square of the other embroidered quilt top last night.This one is going to definitely take a while to complete totally. LOL But I love how it's turning out better than I expected. The colors mesh well together don't you think?
Thursday, November 8, 2012
Reposting this appropriately.
This is a repost from yesterday. And it is being done respectfully per author of the blogs requesting a non reblog.
I thank the author for coming to me and asking also explaining why.
And I truly respect that.
I am today only posting link to her lovely work. Please check out this lovely lady's fabulous blog, which you will see why it caught my eye. :).
And as of today all posts that are of other blogs will only contain a link only from here on out.
Here is the link to the place I had recently posted.
http://katedaviesdesigns.com
Wednesday, November 7, 2012
Tuesday, November 6, 2012
Friday, November 2, 2012
Important question
Are any of my viewers experiencing trouble trying to view my blog posts here?
Are you seeing advertising instead? Please let me know so that I can fix this if I can.
Thursday, November 1, 2012
I have always wanted to do this.
Tips And Tricks Thursday – How Do You Spin? Part 2
http://sandandskycreations.com/blog/2012/11/01/tips-and-tricks-thursday-how-do-you-spin-part-2/
This was a really interesting read. I have always wanted to do something like this, spinning yarn and to know how they did it. This blog post shows how it's done.
Wednesday, October 31, 2012
Christmas Angel Tree Ordainment
Christmas Angel Tree Ordainment.
Totally adorable Christmas Angel over at �
Shellysyarnicles. �Her stuff is so cool.
via Christmas Angel Tree Ordainment.
Totally adorable Christmas Angel over at �
Shellysyarnicles. �Her stuff is so cool.
via Christmas Angel Tree Ordainment.
Tuesday, October 30, 2012
Tree time
These trees are soo cool. I have no idea how she managed to pull this off. But, She has and they are so neat.
Monday, October 29, 2012
Bidding Begins NOW For Mrs. Maplesworth - Crochet Hook Challenge
Now this is very cool. I always wanted to know how they made crochet hooks. Definitely worth sharing.
Tunisian Crochet: Stop the Curling
Take a look at my friend Kim Guzman's newest creation. Absolutely beautiful and she also shows you a trick. Check it out.
Sunday, October 28, 2012
And original re wrote.
Christmas Lattice n’ Shells Doily
Pattern Designed
By
Shani Bush
AKA: Crafty Cat Patterns
©2012 The pattern it’s self may not be copied and sold as your own. You may share a link to my
patterns. You may sell your finished piece. You made it after all.
Materials needed:
Size American 7 (1.65 )Steel Hook
Fingering 10-count crochet thread
Finished Size: Approximately 8”.
Stitches Used:Chain stitch,Treble Stitch, Double Crochet, Half Double Crochet
Updated pattern on 9-28-2012
Note: The first stitch you make counts as first stitch in pattern and will be apart of the total in the end.
Ch 8, join with slip st to form a ring.
Rnd 1: Ch 6, * tr in ring, ch 2; repeat from * 16 times more, join with slip st to fourth ch of beginning ch-6: 18 ch-2 sps.
Rnd 2: Slip st in first sp, ch 3 (counts as first dc), 2 dc in same sp, ch 3, * 3 dc in next sp, ch 3; repeat from * around, join with slip st to first dc: 54 dc and 18 sps.
Rnd 3: Ch 2 (counts as first hdc), hdc in next 2 dc, ch 2, 4 dc in next sp, ch 2, * hdc in next 3 dc, ch 2, 4 dc in next sp, ch 2; repeat from * around, join with slip st to first hdc: 54 hdc and 72 dc.
Rnds 4 and 5: Ch 4 (counts as first tr, now and throughout), tr in next 2 sts, ch 2, skip next sp, tr in next 4 sts, ch 2, skip next sp * tr in next 3 sts, ch 2, skip next sp, tr in next 4 sts, ch 2, skip next sp; repeat from * around, join with slip st to first tr: 36 sps.
Rnd 6: Slip st in next 2 tr and in next sp, ch 4, 4 tr in same sp, ch 2, * 5 tr in next sp, ch 2; repeat from * around, join with slip st to first tr: 180 tr.
Rnd 7: Ch 4, tr in next 4 tr, ch 2, * tr in next 5 tr, ch 2; repeat from * around, join with slip st to first tr: 36 sps.
Rnds 8 and 9: Slip st in next 4 tr and in next sp, ch 4, 6 tr in same sp, ch 3, * 7 tr in next sp, ch 3; repeat from * around, join with slip st to first tr.
Once completed cut thread tie off into a knot on your stitch and weave then cut off
excess.
You now have completed your own doily. I hope you have enjoyed this simple small pattern.
Orignal Doily Design without update
Christmas Lattice n’ Shells Doily
Pattern Designed
Pattern Designed
By
Shani Bush
Aka Crafty Cat Patterns
©2012 The pattern it’s self may not be copied and sold as your own. You may share a link to my patterns.
You may do with however you wish with the finished doily that you made. including sell it. You made it after all.
Materials needed
Size Steel 7 Hook
Size 10 crochet Thread
Stitches Used:Chain stitch,Trebble Stitch, Double Crochet, Half Double Crochet
You can adjust to make it as big or small as you wish.
Start with Chain 8 stitches and join with a slip stitch
Row 1 Ch 5, Tr in next st, ch 2. Repeat 16 more times all the way around. Join with SS
Row 2 Ch 3, DC in the next ch 2 hole 3 times repeating it 16 more times and joining with SS to your first chain 3 st
Row 3 HDC in the next 3 stitches, ch 2, DC 4 times in the next space. Repeat 16 more times and join with SS to your first SS
Row 4 SS in next 2 sts * Ch 4 Tr in next st, ch 5* repeat last step 16 more times join with SS
Row 5 Alternating this row Ch 4 Tr in next space 7 Times repeating 16 more times.
Repeat this row once again.
Once completed cut thread tie off into a knot on your stitch and weave then cut off excess.
You now have completed your own doily. I hope you have enjoyed this simple small pattern.
My older version
Christmas Lattice n' Shells Doily
Pattern Designed
By
Shani Bush
Aka Crafty Cat Patterns
©2012 The pattern it's self may not be copied and sold as your own. You may share a link to my patterns.
You may do with however what you wish with the finished doily that you made. including sell it. You made it after all.
Materials needed:
Size Steel 7 Hook
Size 10 crochet Thread
Stitches Used:Chain stitch,Trebble Stitch, Double Crochet, Half Double Crochet
You can adjust to make it as big or small as you wish.
Start with Chain 8 stitches and join with a slip stitch
Row 1 Ch 5, Tr in next st, ch 2. Repeat 16 more times all the way around. Join with SS
Row 2 Ch 3, DC in the next ch 2 hole 3 times repeating it 16 more times and joining with SS to your first chain 3 st
Row 3 HDC in hte next 3 stitches, ch 2, DC 4 times in the next space. Repeat 16 more times and join with SS to your first SS
Row 4 SS in next 2 sts * Ch 4 Tr in next st, ch 5* repeat last step 16 more times join with SS
Row 5 Alternating this row Ch 4 Tr in next space 7 Times repeating 16 more times.
Repeat this row once again.
Once completed cut thread tie off into a knot on your stitch and weave then cut off excess.
You now have completed your own doily. I hope you have enjoyed this simple small pattern.
Christmas Lattice Doily
Okay I'm going to put re reworked of the original up here and also in next posting will be my defective original without reworking.
Christmas Lattice n' Shells Doily
Pattern Designed
By
Shani Bush
AKA: Crafty Cat Patterns
©2012 The pattern it's self may not be copied and sold as your own. You may share a link to my
patterns. You may sell your finished piece. You made it after all.
Materials needed:
Size American 7 (1.65 )Steel Hook
Fingering 10-count crochet thread
Finished Size: Approximately 8”.
Stitches Used:Chain stitch,Treble Stitch, Double Crochet, Half Double Crochet
Updated pattern on 9-28-2012
Note: The first stitch you make counts as first stitch in pattern and will be apart of the total in the end.
Ch 8, join with slip st to form a ring.
Rnd 1: Ch 6, * tr in ring, ch 2; repeat from * 16 times more, join with slip st to fourth ch of beginning ch-6: 18 ch-2 sps.
Rnd 2: Slip st in first sp, ch 3 (counts as first dc), 2 dc in same sp, ch 3, * 3 dc in next sp, ch 3; repeat from * around, join with slip st to first dc: 54 dc and 18 sps.
Rnd 3: Ch 2 (counts as first hdc), hdc in next 2 dc, ch 2, 4 dc in next sp, ch 2, * hdc in next 3 dc, ch 2, 4 dc in next sp, ch 2; repeat from * around, join with slip st to first hdc: 54 hdc and 72 dc.
Rnds 4 and 5: Ch 4 (counts as first tr, now and throughout), tr in next 2 sts, ch 2, skip next sp, tr in next 4 sts, ch 2, skip next sp * tr in next 3 sts, ch 2, skip next sp, tr in next 4 sts, ch 2, skip next sp; repeat from * around, join with slip st to first tr: 36 sps.
Rnd 6: Slip st in next 2 tr and in next sp, ch 4, 4 tr in same sp, ch 2, * 5 tr in next sp, ch 2; repeat from * around, join with slip st to first tr: 180 tr.
Rnd 7: Ch 4, tr in next 4 tr, ch 2, * tr in next 5 tr, ch 2; repeat from * around, join with slip st to first tr: 36 sps.
Rnds 8 and 9: Slip st in next 4 tr and in next sp, ch 4, 6 tr in same sp, ch 3, * 7 tr in next sp, ch 3; repeat from * around, join with slip st to first tr.
Once completed cut thread tie off into a knot on your stitch and weave then cut off
excess.
You now have completed your own doily. I hope you have enjoyed this simple small pattern.
Thursday, October 25, 2012
I'm thinking
Of putting the original doily pattern up on the blog. What do you think? Do you love or hate the idea. I got to thinking last night and decided to ask you. I thought if yes I would put it up here for easy access. And you could still try the defective one if you liked it more than the newer pattern.
Let me know in comments what you think. and if you like it I may do it on a regular basis.
Let me know in comments what you think. and if you like it I may do it on a regular basis.
Sunday, October 21, 2012
Lets do something interesting.
Now, I know we all started from scratch when we crocheted meaning the first thing we ever did. Didn’t turn out like it was supposed to the first time.
Me I confess that purple hat that is on here that I made for my mom. Turned into a first time disaster. And it was shear luck I did decide to try it on her in plenty of time even though it was to a present for her. Which was actually pretty funny when I think of it now. Though back then I was so embarrassed that I had gotten it so small that it didn’t fit her head. I was glad though for the time to redo it and make sure it was correct. She now wears that hat proudly every winter.
LOL If only I had taken a picture of it when I first did it just for laughs. It was amusing watching her try to put it on while giggling.
Then there was the granny square trials. Now those I do have and here are the results.lol
You can definitely tell a difference here in my progression or regression whatever you want to call it. But I didn’t just stop trying to get them correct. I kept going and kept trying.
And yes, I did succeed. You can tell by the green one in previous posts
1st one

second one
Okay your turn now. Post on your blog with photos of your first tries. And put a link in the comments section of this post.
Don’t be shy. Everyone has had these tries in the beginning.
Lets do something interesting.
Now, I know we all started from scratch when we crocheted meaning the first thing we ever did. Didn't turn out like it was supposed to the first time.
Me I confess that purple hat that is on here that I made for my mom. Turned into a first time disaster. And it was shear luck I did decide to try it on her in plenty of time even though it was to a present for her. Which was actually pretty funny when I think of it now. Though back then I was so embarrassed that I had gotten it so small that it didn't fit her head. I was glad though for the time to redo it and make sure it was correct. She now wears that hat proudly every winter.
LOL If only I had taken a picture of it when I first did it just for laughs. It was amusing watching her try to put it on while giggling.
Then there was the granny square trials. Now those I do have and here are the results.lol
You can definitely tell a difference here in my progression or regression whatever you want to call it. But I didn't just stop trying to get them correct. I kept going and kept trying.
And yes, I did succeed. You can tell by the green one in previous posts
1st one

second one
Okay your turn now. Post on your blog with photos of your first tries. And put a link in the comments section of this post.
Don't be shy. Everyone has had these tries in the beginning.
Me I confess that purple hat that is on here that I made for my mom. Turned into a first time disaster. And it was shear luck I did decide to try it on her in plenty of time even though it was to a present for her. Which was actually pretty funny when I think of it now. Though back then I was so embarrassed that I had gotten it so small that it didn't fit her head. I was glad though for the time to redo it and make sure it was correct. She now wears that hat proudly every winter.
LOL If only I had taken a picture of it when I first did it just for laughs. It was amusing watching her try to put it on while giggling.
Then there was the granny square trials. Now those I do have and here are the results.lol
You can definitely tell a difference here in my progression or regression whatever you want to call it. But I didn't just stop trying to get them correct. I kept going and kept trying.
And yes, I did succeed. You can tell by the green one in previous posts
1st one
second one
Okay your turn now. Post on your blog with photos of your first tries. And put a link in the comments section of this post.
Don't be shy. Everyone has had these tries in the beginning.
On the blogs I requested
I retract that as of now. I won't be requesting any thing like this for quite some time. Due to something unpleasant.
I will not go into detail as it is a closed matter.
It just has soured my experience for the time being of making new friends.
Thank you for understanding. and please no comments on this one. Lets move on.
I will have some new stuff on my work in progresses soon.
I will not go into detail as it is a closed matter.
It just has soured my experience for the time being of making new friends.
Thank you for understanding. and please no comments on this one. Lets move on.
I will have some new stuff on my work in progresses soon.
Thursday, October 18, 2012
I'm looking for.
Hello my viewers if you have or know of any craft blogs of all kinds that are on wordpress let me know in comments section. And remember they must be of crafts nature anything other than that will be ignored. I'm looking for some cool places to follow and browse.
Tuesday, October 16, 2012
MysteriousMusingsCrafts&Designs.
To chat with me anytime check out my fanpage for not just crafts, I also write short stories, blog novels, and poetry.
And Also I have the pattern updated up on Ravelry and Craftsy
Craftsy link is the same as before. Just a new fresh upload.
MysteriousMusingsCrafts&Designs.
MysteriousMusingsCrafts&Designs..
To chat with me anytime check out my fanpage for not just crafts, I also write short stories, blog novels, and poetry.
And Also I have the pattern updated up on Ravelry and Craftsy
http://www.ravelry.com/patterns/library/christmas-lattice-n-shells-doily
Craftsy link is the same as before. Just a new fresh upload.

Saturday, September 29, 2012
Another Delay.
This revamping is taking longer than I had anticipated. I want to be sure of Accuracy and Clarity.
So I'm taking extra steps to ensure that. If all works out. Possibly no later than next week I will be able to have that picture and the new pattern up.
Another Delay.
This revamping is taking longer than I had anticipated. I want to be sure of Accuracy and Clarity.
So I'm taking extra steps to ensure that. If all works out. Possibly no later than next week I will be able to have that picture and the new pattern up.
So I'm taking extra steps to ensure that. If all works out. Possibly no later than next week I will be able to have that picture and the new pattern up.
Friday, September 28, 2012
Doily update
Sorry folks I had intended to upload the doily today. But been alittle crazy offline. Hopefully I can get it done tomorrow. Soo sorry folks
Doily update
Sorry folks I had intended to upload the doily today. But been alittle crazy offline. Hopefully I can get it done tomorrow. Soo sorry folks
Thursday, September 27, 2012
update
I will be republishing new updated version of the doily pattern by tomorrow.
I will take this step to ensure I have re completed the updated version of the product picture its self. This will be worth it folks. Just bare with me here for 24 hours. The next doily will be done some time with in the next month.
*Update
I will be republishing new updated version of the doily pattern by tomorrow.
I will take this step to ensure I have re completed the updated version of the product picture its self. This will be worth it folks. Just bare with me here for 24 hours. The next doily will be done some time with in the next month.
Updated Pattern Coming soon
Updated Pattern coming soon. A dear friend is looking it over and we are adjusting for clarity purposes. We both agree that any pattern must be of good understanding. :) Will let you know when We have it done and new version uploaded.
Updated Pattern coming soon
Updated Pattern coming soon. A dear friend is looking it over and we are adjusting for clarity purposes. We both agree that any pattern must be of good understanding. :) Will let you know when We have it done and new version uploaded.
Friday, September 14, 2012
Link fixed on the Ravelry link
Slight goof up, many apologies for that I forgot to add Ravelry's link. It's now up and you can access it from there now. I hope you enjoy the pattern and I'd love to see your results. :)
Thursday, September 13, 2012
New Pattern/Doily

Newest Pattern
I have made a pattern which you can find under the pattern page to my Ravelry and Craftsy Shops.


Monday, August 20, 2012
My Newest Doily Project
Is coming along great. I should have it done soon. This time no peeking until finished.lol
This time I’m doing it in white, don’t know what color or pattern I will do next. I may eventually try making my own doily pattern. But, that’s still to be decided.LOL If I can really get the hang of the doily thing that is. So hopefully in a couple days I will have a nice freshly done doily picture posted. Keep a look out.
Wooo Hoo
I got two awards that I have placed on the side panel here. From the Ravelry games.
Note: I thought it was posted here.
My Newest Doily Project
Is coming along great. I should have it done soon. This time no peeking until finished.lol
This time I'm doing it in white, don't know what color or pattern I will do next. I may eventually try making my own doily pattern. But, that's still to be decided.LOL If I can really get the hang of the doily thing that is. So hopefully in a couple days I will have a nice freshly done doily picture posted. Keep a look out.
This time I'm doing it in white, don't know what color or pattern I will do next. I may eventually try making my own doily pattern. But, that's still to be decided.LOL If I can really get the hang of the doily thing that is. So hopefully in a couple days I will have a nice freshly done doily picture posted. Keep a look out.
Tuesday, August 14, 2012
Wooo Hooo
I got two awards that I have placed on the side panel here. From the Ravelry games.
Note: Now you will see both award.lol Got the link to the wrong one on the second award.
Note: Now you will see both award.lol Got the link to the wrong one on the second award.
Saturday, August 11, 2012
Simplicity Doily ( I know I know it's not the other one.lol
Ookay I did a totally different pattern.lol
But here are my results from it as I have finished it and done and did the Ravellenics hehhe
It was actually supposed to turn out ruffled.lol But not bad for a first try eh.
But here are my results from it as I have finished it and done and did the Ravellenics hehhe
It was actually supposed to turn out ruffled.lol But not bad for a first try eh.

Simplicity Doily ( I know I know it's not the other one.lol
Ookay I did a totally different pattern.lol
But here are my results from it as I have finished it and done and did the Ravellenics hehhe
It was actually supposed to turn out ruffled.lol But not bad for a first try eh.

But here are my results from it as I have finished it and done and did the Ravellenics hehhe
It was actually supposed to turn out ruffled.lol But not bad for a first try eh.

Saturday, July 28, 2012
Blog Carnival - craft bliss world
Blog Carnival - craft bliss world.
It's back on And I'll be extending the submissions to Oct 1. :) Since their was some problems.
It's back on And I'll be extending the submissions to Oct 1. :) Since their was some problems.
Friday, July 27, 2012
Work-in-progress Sweet Daisy Doily
I've been working on the doily and I'm in Ravelry's Ravellenics. This is what I have completed so far. Nice huh? This has been quiet a learning experience.


Work-in-progress Sweet Daisy Doily
I've been working on the doily and I'm in Ravelry's Ravellenics. This is what I have completed so far. Nice huh? This has been quiet a learning experience.
Sunday, July 22, 2012
A word of advice for beginner Crocheter’s
When you are beginning to try out Doilies.
You should always live by two rules
1. Use the hook specified in the pattern.
2. Go Simple the more simple the pattern the more chance you’ll have of accomplishing the task of learning.
I recommend this doily to any beginner. http://www.daintycrochet.com/doilysweetdaisy.html
This is the one I’m currently trying out. I’m doing a lot better than I had been. my tension maybe abit loose I don’t know. I do know I should have started with this one at the very beginning. LOL
I will have a work in progress photo of it soon. 
A word of advice for beginner Crocheter's....
When you are beginning to try out Doilies.
You should always live by two rules
1. Use the hook specified in the pattern.
2. Go Simple the more simple the pattern the more chance you'll have of accomplishing the task of learning.
I recommend this doily to any beginner. http://www.daintycrochet.com/doilysweetdaisy.html
This is the one I'm currently trying out. I'm doing a lot better than I had been. my tension maybe abit loose I don't know. I do know I should have started with this one at the very beginning. LOL
I will have a work in progress photo of it soon. :)
Friday, July 13, 2012
Note
All comments are moderated. Due to large amount of spammer junk especially with links that are virus laden, will be automatically deleted.
Only valid comments will go through.
Only valid comments will go through.
Monday, July 9, 2012
Crochet Granny Square.
I can say with certainty that this as a dozy to learn on m ol noggin.lol

But I finally accomplished it.

Crochet Granny Square
I can say with certainty that this as a dozy to learn on m ol noggin.lol

But I finally accomplished it.

Friday, July 6, 2012
")

Wednesday, July 4, 2012
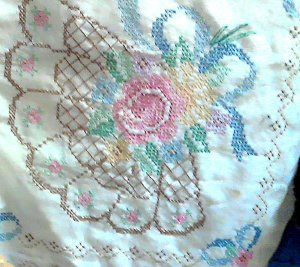
Embroidered Pansies and Butterflies Pillow topper

My latest craft project just completed. I really love how this one turned out! the colors worked quiet well.
Embroidered Pansies and Butterflies Pillow topper

Saturday, June 30, 2012
Blog Carnival - craft bliss world
Blog Carnival Craft Bliss World Is canceled until futher notice.
The Site Blog Carnival is still down and I have no clue when it'll be up and running again.
The Site Blog Carnival is still down and I have no clue when it'll be up and running again.
Wednesday, June 27, 2012

Floral Rug
Somehow I missed uploading this one when I was creating this blog.

This is a rug I made for my granny for a either Birthday or Christmas gift.
Monday, June 25, 2012
BEADED CANDY CANE ORNAMENT TUTORIAL.
Materialls Needed
Needle nose Pliers
Chennile ( I used silver. But you can use any color you like they make them in many colors)
Large hole beads (Assorted)
Taking a piece at any size you want your candy cane to be.
Place about 15 or so beads on to your tinsel.
Once you’ve done that with the rest of your Chennile tinsel start wrapping it from the bottom part of your left over wrapping it around and between each bead until you have it completely covered.
The do the same for the other end making sure that the rough edge of the chennile won’t scrap skin by taking your pliers and wrapping them around in on them selves.
Then bend one end into the shape of an Candy cane.
Beaded Candy Cane Ornament Tutorial.
Materials Needed
Needle nose Pliers
Chenille Wire ( I used silver. But you can use any color you like they make them in many colors)
Large hole beads (Assorted)
Taking a piece at any size you want your candy cane to be.
Place about 15 or so beads on to your tinsel.
Once you've done that with the rest of your Chennile tinsel start wrapping it from the bottom part of your left over wrapping it around and between each bead until you have it completely covered.
The do the same for the other end making sure that the rough edge of the chennile won't scrap skin by taking your pliers and wrapping them around in on them selves.
Then bend one end into the shape of an Candy cane.
Friday, June 22, 2012
Embroidered Quilt top
Here is an in progress. This is an embroidered fan with florals quilt top. This maybe isn't the best quality I will try to take it again later.

Embroidered Quilt top
Here is an in progress. This is an embroidered fan with florals quilt top. This maybe isn't the best quality I will try to take it again later.


Friday, February 24, 2012
Doilies Uh oh
I am currently working on crocheting a Pineapple Doily. LOL So far interesting experience. I hope to have it done soon, then I will work on making at least one granny square. I had started practicing this one but, it gonna be a long while before I can post a picture.lol Granny square NOT easy.
Subscribe to:
Posts (Atom)