Christmas Angel Tree Ordainment.
Totally adorable Christmas Angel over at �
Shellysyarnicles. �Her stuff is so cool.
via Christmas Angel Tree Ordainment.

This is just my lil place to show what I'm either working on or have made.
Wednesday, October 31, 2012
Tuesday, October 30, 2012
Tree time
These trees are soo cool. I have no idea how she managed to pull this off. But, She has and they are so neat.
Monday, October 29, 2012
Bidding Begins NOW For Mrs. Maplesworth - Crochet Hook Challenge
Now this is very cool. I always wanted to know how they made crochet hooks. Definitely worth sharing.
Tunisian Crochet: Stop the Curling
Take a look at my friend Kim Guzman's newest creation. Absolutely beautiful and she also shows you a trick. Check it out.
Sunday, October 28, 2012
And original re wrote.
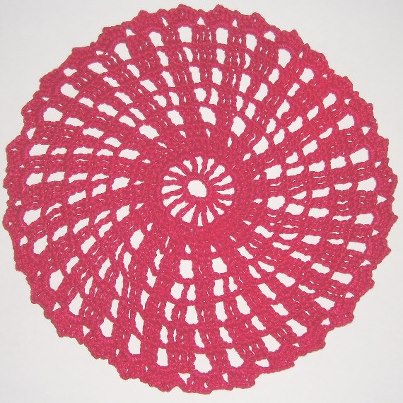
Christmas Lattice n’ Shells Doily
Pattern Designed
By
Shani Bush
AKA: Crafty Cat Patterns
©2012 The pattern it’s self may not be copied and sold as your own. You may share a link to my
patterns. You may sell your finished piece. You made it after all.
Materials needed:
Size American 7 (1.65 )Steel Hook
Fingering 10-count crochet thread
Finished Size: Approximately 8”.
Stitches Used:Chain stitch,Treble Stitch, Double Crochet, Half Double Crochet
Updated pattern on 9-28-2012
Note: The first stitch you make counts as first stitch in pattern and will be apart of the total in the end.
Ch 8, join with slip st to form a ring.
Rnd 1: Ch 6, * tr in ring, ch 2; repeat from * 16 times more, join with slip st to fourth ch of beginning ch-6: 18 ch-2 sps.
Rnd 2: Slip st in first sp, ch 3 (counts as first dc), 2 dc in same sp, ch 3, * 3 dc in next sp, ch 3; repeat from * around, join with slip st to first dc: 54 dc and 18 sps.
Rnd 3: Ch 2 (counts as first hdc), hdc in next 2 dc, ch 2, 4 dc in next sp, ch 2, * hdc in next 3 dc, ch 2, 4 dc in next sp, ch 2; repeat from * around, join with slip st to first hdc: 54 hdc and 72 dc.
Rnds 4 and 5: Ch 4 (counts as first tr, now and throughout), tr in next 2 sts, ch 2, skip next sp, tr in next 4 sts, ch 2, skip next sp * tr in next 3 sts, ch 2, skip next sp, tr in next 4 sts, ch 2, skip next sp; repeat from * around, join with slip st to first tr: 36 sps.
Rnd 6: Slip st in next 2 tr and in next sp, ch 4, 4 tr in same sp, ch 2, * 5 tr in next sp, ch 2; repeat from * around, join with slip st to first tr: 180 tr.
Rnd 7: Ch 4, tr in next 4 tr, ch 2, * tr in next 5 tr, ch 2; repeat from * around, join with slip st to first tr: 36 sps.
Rnds 8 and 9: Slip st in next 4 tr and in next sp, ch 4, 6 tr in same sp, ch 3, * 7 tr in next sp, ch 3; repeat from * around, join with slip st to first tr.
Once completed cut thread tie off into a knot on your stitch and weave then cut off
excess.
You now have completed your own doily. I hope you have enjoyed this simple small pattern.
Orignal Doily Design without update
Christmas Lattice n’ Shells Doily
Pattern Designed
Pattern Designed
By
Shani Bush
Aka Crafty Cat Patterns
©2012 The pattern it’s self may not be copied and sold as your own. You may share a link to my patterns.
You may do with however you wish with the finished doily that you made. including sell it. You made it after all.
Materials needed
Size Steel 7 Hook
Size 10 crochet Thread
Stitches Used:Chain stitch,Trebble Stitch, Double Crochet, Half Double Crochet
You can adjust to make it as big or small as you wish.
Start with Chain 8 stitches and join with a slip stitch
Row 1 Ch 5, Tr in next st, ch 2. Repeat 16 more times all the way around. Join with SS
Row 2 Ch 3, DC in the next ch 2 hole 3 times repeating it 16 more times and joining with SS to your first chain 3 st
Row 3 HDC in the next 3 stitches, ch 2, DC 4 times in the next space. Repeat 16 more times and join with SS to your first SS
Row 4 SS in next 2 sts * Ch 4 Tr in next st, ch 5* repeat last step 16 more times join with SS
Row 5 Alternating this row Ch 4 Tr in next space 7 Times repeating 16 more times.
Repeat this row once again.
Once completed cut thread tie off into a knot on your stitch and weave then cut off excess.
You now have completed your own doily. I hope you have enjoyed this simple small pattern.
My older version
Christmas Lattice n' Shells Doily
Pattern Designed
By
Shani Bush
Aka Crafty Cat Patterns
©2012 The pattern it's self may not be copied and sold as your own. You may share a link to my patterns.
You may do with however what you wish with the finished doily that you made. including sell it. You made it after all.
Materials needed:
Size Steel 7 Hook
Size 10 crochet Thread
Stitches Used:Chain stitch,Trebble Stitch, Double Crochet, Half Double Crochet
You can adjust to make it as big or small as you wish.
Start with Chain 8 stitches and join with a slip stitch
Row 1 Ch 5, Tr in next st, ch 2. Repeat 16 more times all the way around. Join with SS
Row 2 Ch 3, DC in the next ch 2 hole 3 times repeating it 16 more times and joining with SS to your first chain 3 st
Row 3 HDC in hte next 3 stitches, ch 2, DC 4 times in the next space. Repeat 16 more times and join with SS to your first SS
Row 4 SS in next 2 sts * Ch 4 Tr in next st, ch 5* repeat last step 16 more times join with SS
Row 5 Alternating this row Ch 4 Tr in next space 7 Times repeating 16 more times.
Repeat this row once again.
Once completed cut thread tie off into a knot on your stitch and weave then cut off excess.
You now have completed your own doily. I hope you have enjoyed this simple small pattern.
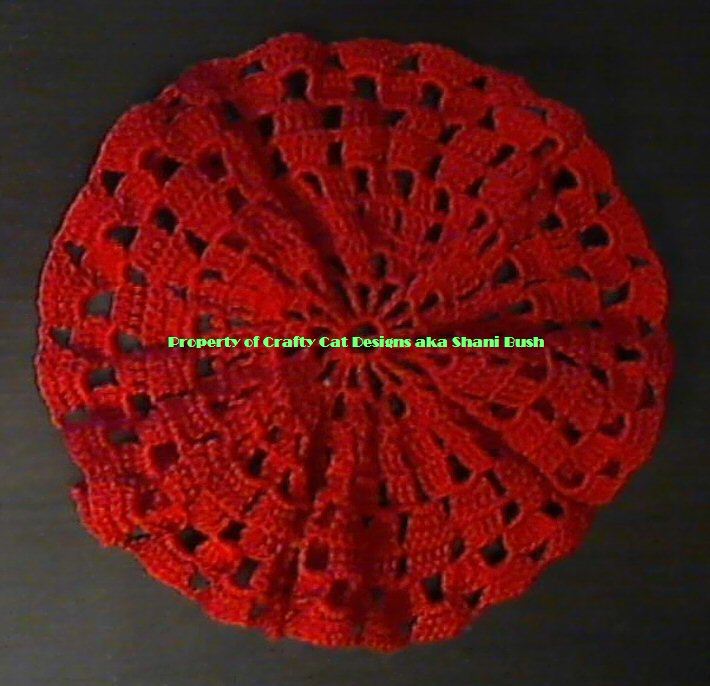
Christmas Lattice Doily
Okay I'm going to put re reworked of the original up here and also in next posting will be my defective original without reworking.
Christmas Lattice n' Shells Doily
Pattern Designed
By
Shani Bush
AKA: Crafty Cat Patterns
©2012 The pattern it's self may not be copied and sold as your own. You may share a link to my
patterns. You may sell your finished piece. You made it after all.
Materials needed:
Size American 7 (1.65 )Steel Hook
Fingering 10-count crochet thread
Finished Size: Approximately 8”.
Stitches Used:Chain stitch,Treble Stitch, Double Crochet, Half Double Crochet
Updated pattern on 9-28-2012
Note: The first stitch you make counts as first stitch in pattern and will be apart of the total in the end.
Ch 8, join with slip st to form a ring.
Rnd 1: Ch 6, * tr in ring, ch 2; repeat from * 16 times more, join with slip st to fourth ch of beginning ch-6: 18 ch-2 sps.
Rnd 2: Slip st in first sp, ch 3 (counts as first dc), 2 dc in same sp, ch 3, * 3 dc in next sp, ch 3; repeat from * around, join with slip st to first dc: 54 dc and 18 sps.
Rnd 3: Ch 2 (counts as first hdc), hdc in next 2 dc, ch 2, 4 dc in next sp, ch 2, * hdc in next 3 dc, ch 2, 4 dc in next sp, ch 2; repeat from * around, join with slip st to first hdc: 54 hdc and 72 dc.
Rnds 4 and 5: Ch 4 (counts as first tr, now and throughout), tr in next 2 sts, ch 2, skip next sp, tr in next 4 sts, ch 2, skip next sp * tr in next 3 sts, ch 2, skip next sp, tr in next 4 sts, ch 2, skip next sp; repeat from * around, join with slip st to first tr: 36 sps.
Rnd 6: Slip st in next 2 tr and in next sp, ch 4, 4 tr in same sp, ch 2, * 5 tr in next sp, ch 2; repeat from * around, join with slip st to first tr: 180 tr.
Rnd 7: Ch 4, tr in next 4 tr, ch 2, * tr in next 5 tr, ch 2; repeat from * around, join with slip st to first tr: 36 sps.
Rnds 8 and 9: Slip st in next 4 tr and in next sp, ch 4, 6 tr in same sp, ch 3, * 7 tr in next sp, ch 3; repeat from * around, join with slip st to first tr.
Once completed cut thread tie off into a knot on your stitch and weave then cut off
excess.
You now have completed your own doily. I hope you have enjoyed this simple small pattern.
Thursday, October 25, 2012
I'm thinking
Of putting the original doily pattern up on the blog. What do you think? Do you love or hate the idea. I got to thinking last night and decided to ask you. I thought if yes I would put it up here for easy access. And you could still try the defective one if you liked it more than the newer pattern.
Let me know in comments what you think. and if you like it I may do it on a regular basis.
Let me know in comments what you think. and if you like it I may do it on a regular basis.
Sunday, October 21, 2012
Lets do something interesting.
Now, I know we all started from scratch when we crocheted meaning the first thing we ever did. Didn’t turn out like it was supposed to the first time.
Me I confess that purple hat that is on here that I made for my mom. Turned into a first time disaster. And it was shear luck I did decide to try it on her in plenty of time even though it was to a present for her. Which was actually pretty funny when I think of it now. Though back then I was so embarrassed that I had gotten it so small that it didn’t fit her head. I was glad though for the time to redo it and make sure it was correct. She now wears that hat proudly every winter.
LOL If only I had taken a picture of it when I first did it just for laughs. It was amusing watching her try to put it on while giggling.
Then there was the granny square trials. Now those I do have and here are the results.lol
You can definitely tell a difference here in my progression or regression whatever you want to call it. But I didn’t just stop trying to get them correct. I kept going and kept trying.
And yes, I did succeed. You can tell by the green one in previous posts
1st one

second one
Okay your turn now. Post on your blog with photos of your first tries. And put a link in the comments section of this post.
Don’t be shy. Everyone has had these tries in the beginning.
Lets do something interesting.
Now, I know we all started from scratch when we crocheted meaning the first thing we ever did. Didn't turn out like it was supposed to the first time.
Me I confess that purple hat that is on here that I made for my mom. Turned into a first time disaster. And it was shear luck I did decide to try it on her in plenty of time even though it was to a present for her. Which was actually pretty funny when I think of it now. Though back then I was so embarrassed that I had gotten it so small that it didn't fit her head. I was glad though for the time to redo it and make sure it was correct. She now wears that hat proudly every winter.
LOL If only I had taken a picture of it when I first did it just for laughs. It was amusing watching her try to put it on while giggling.
Then there was the granny square trials. Now those I do have and here are the results.lol
You can definitely tell a difference here in my progression or regression whatever you want to call it. But I didn't just stop trying to get them correct. I kept going and kept trying.
And yes, I did succeed. You can tell by the green one in previous posts
1st one

second one
Okay your turn now. Post on your blog with photos of your first tries. And put a link in the comments section of this post.
Don't be shy. Everyone has had these tries in the beginning.
Me I confess that purple hat that is on here that I made for my mom. Turned into a first time disaster. And it was shear luck I did decide to try it on her in plenty of time even though it was to a present for her. Which was actually pretty funny when I think of it now. Though back then I was so embarrassed that I had gotten it so small that it didn't fit her head. I was glad though for the time to redo it and make sure it was correct. She now wears that hat proudly every winter.
LOL If only I had taken a picture of it when I first did it just for laughs. It was amusing watching her try to put it on while giggling.
Then there was the granny square trials. Now those I do have and here are the results.lol
You can definitely tell a difference here in my progression or regression whatever you want to call it. But I didn't just stop trying to get them correct. I kept going and kept trying.
And yes, I did succeed. You can tell by the green one in previous posts
1st one
second one
Okay your turn now. Post on your blog with photos of your first tries. And put a link in the comments section of this post.
Don't be shy. Everyone has had these tries in the beginning.
On the blogs I requested
I retract that as of now. I won't be requesting any thing like this for quite some time. Due to something unpleasant.
I will not go into detail as it is a closed matter.
It just has soured my experience for the time being of making new friends.
Thank you for understanding. and please no comments on this one. Lets move on.
I will have some new stuff on my work in progresses soon.
I will not go into detail as it is a closed matter.
It just has soured my experience for the time being of making new friends.
Thank you for understanding. and please no comments on this one. Lets move on.
I will have some new stuff on my work in progresses soon.
Thursday, October 18, 2012
I'm looking for.
Hello my viewers if you have or know of any craft blogs of all kinds that are on wordpress let me know in comments section. And remember they must be of crafts nature anything other than that will be ignored. I'm looking for some cool places to follow and browse.
Tuesday, October 16, 2012
MysteriousMusingsCrafts&Designs.
To chat with me anytime check out my fanpage for not just crafts, I also write short stories, blog novels, and poetry.
And Also I have the pattern updated up on Ravelry and Craftsy
Craftsy link is the same as before. Just a new fresh upload.
MysteriousMusingsCrafts&Designs.
MysteriousMusingsCrafts&Designs..
To chat with me anytime check out my fanpage for not just crafts, I also write short stories, blog novels, and poetry.
And Also I have the pattern updated up on Ravelry and Craftsy
http://www.ravelry.com/patterns/library/christmas-lattice-n-shells-doily
Craftsy link is the same as before. Just a new fresh upload.

Subscribe to:
Comments (Atom)